|
<< Click to Display Table of Contents >> Adding PBRules |
  
|
|
<< Click to Display Table of Contents >> Adding PBRules |
  
|
Open the Administration application.
Select the Pay and Bill tab on the left of the window.
Select the PBRules tab displayed at the top of the window.
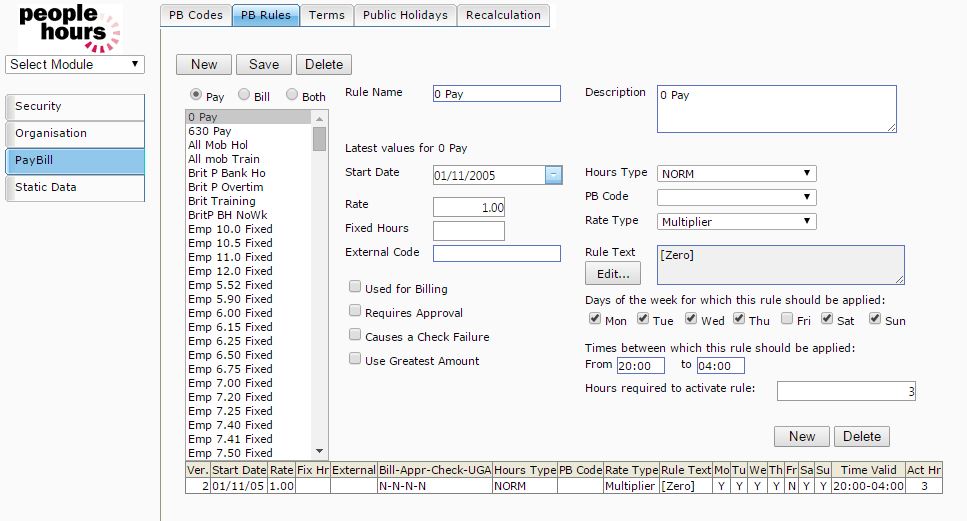
The PB Rules window will be displayed. All existing PBRules will be displayed in the list on the left of the window.
 Example PBRule |
Click on the Rule Name field and enter the name you want to apply to the rule.
Click on the Description field and enter the description for the rule you are setting up.
Click on the Start Date field and enter the date from which the rule becomes effective.
Click on the Rate field and enter the rate to be applied by the rule.
Click on the External Code field and enter the value required.
This field is optional and can be used to provide a link to the payment or bill type to an external Payroll, Invoicing or Accounts application.
If the PBRule is to be used for invoicing, tick the ‘Used for Billing’ box by clicking on it. If this option is not ticked, the application will assume the rule is for payroll purposes.
If you wish all instances of the PBRule being used to be subject to the Approval process tick the ‘Requires Approval’ box by clicking on it.
If you wish the Event Check process to flag up where the rule is being applied when performing Event checks, tick the ‘Cause a Check Failure’ box by clicking on it.
Click on the Hours Type field and select the required hour’s type from the dropdown list. The available values are:
Type |
Description |
NORM |
the rule is to be applied for all hours worked |
OT1 |
the rule is to be applied once the employee has exceeded the daily overtime 1 threshold held against the employee record |
OT2 |
the rule is to be applied once the employee has exceeded the daily overtime 2 threshold held against the employee record |
POT |
the rule is to be applied once the employee has exceeded the period overtime threshold held against the employee record |
START |
The rule is to be applied for any event started that matches the rule. An example would be a post specific event fixed allowance |
Tab to the PB Code field and select the required option from the drop down list. The options available are:
Type |
Description |
Blank |
No additional rules apply |
OT |
this is used to specify that the overtime calculation rules are to be applied if existing |
Tab to the Rate Type field and select the required option from the dropdown list. The available options are:
Type |
Description |
Flat |
used to specify a one off amount, e.g. an allowance |
Hourly |
used to specify the hourly rate to be used |
Multiplier |
Used to specify the multiplier to be used, e.g. 0.5 would be used for time and a half. This would be represented as 2 values, the normal rate and an uplift of 50%. |
Tab to the Rules Text field and click on the button displayed to the right.
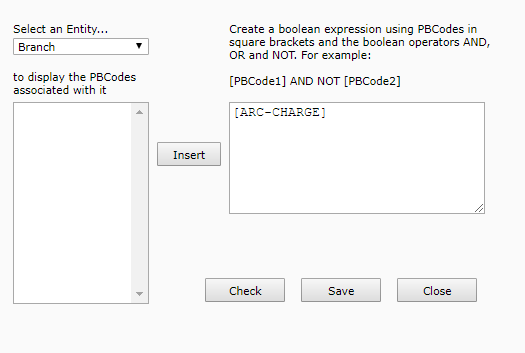
The application will display the Rules Text Editor window, see below.

Rules Text Editor
The Rules Text Editor window is used to build up the PBCode criteria to be used by the application to determine whether the PBRule should be applied.
When you have completed setting up the criteria, click on the ‘Check’ button to confirm that the codes selected and formula applied are valid.
Click on the ‘Save’ button, the data will be saved and you will be returned to the PBRules window. Your criteria will now be displayed in the Rules Text field.
Click on the ‘Save’ button, your new rule will now be displayed in the list on the left and the details of the rule will be displayed in a table at the bottom of the screen.
If you wish to save the record and add another, click on the 'New' button.
Your record will be saved and displayed in the list on the left and the data fields will be cleared ready for the next entry.